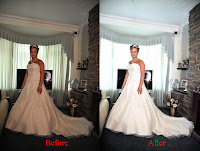
Here's an image I edited for a colleague of mine, the original shot lit by a video light has several issues that need to be addressed from an editing point of view.
The first step was fixing the exposure, here I used the levels tool in photoshop to get it pretty close, I used an adjustment layer because I knew I'd have to come back to levels and "tweek" it later.
The colour was the next step, because a video light was used the image has quite a warm colour, with the exposure sorted it was easier to see the colour cast properly, I used the colour balance tool in photoshop adjusting the shadows, mid tones and highlights separately.
The next problem was that the adjustments had left the skin tones far too orange and saturated, so now I switched to the hue/saturation palette in photoshop, and selectively corrected the colour, the saturation and lightness of just the skin.
Next step was reducing the noise levels, because the image was under exposed slightly there was a fair bit of noise present, for this I used Noiseware pro, as it's much better than the noise removal in photoshop.
Next I decided to soften the background a bit, I selected just the bride, then used a blur filter to soften the background slightly, by using this on a duplicate layer I could use layer masks to put some sharpness back where I wanted it.
The final step was a quick tweek of the levels, as the other adjustments had affected them slightly, then flatten the layers and job done.
Nobody said it would be easy!

No comments:
Post a Comment